Paper I — Q1
(a) Draw the free body diagram of link ABCD and determine all reaction forces acting at A, B, C and D of the assembly shown in…
Draw the free body diagram of link ABCD and determine all reaction forces acting at A, B, C and D of the assembly shown in the figure. (All dimensions are in mm.) 10 marks
A horizontal cantilever beam of length 2L has its free end attached to a vertical tie rod of length L and area 'A', which is initially unstrained. If the moment of inertia of the cantilever beam is I, determine the load taken by the tie rod when a uniformly distributed load of 'w' per unit run is placed on the inner half length of the cantilever. Modulus of elasticity for the tie rod and cantilever beam is E. 10 marks
Calculate the maximum bending moment at points 'C' and 'D' if the five loads of 160 kN equally spaced at 1·52 m, cross the beam from right to left. 10 marks
A tie member of a truss consisting of an angle-iron section ISA 65 × 65 × 6 of Fe 410 grade, is welded to an 8 mm gusset plate. Design the weld to transmit a load equal to the full strength of the member. Assume shop welding. Take weld size as 4 mm and fy = 250 MPa, properties of ISA 65 × 65 × 6 are: A = 744 mm², Cz = 18·1 mm, γm0 = 1·1, γm1 = 1·25. Tdb = [Avg fy/(√3 γm0) + 0·9 Atn fu/γm1] or Tdb = [0·9Avn fu/(√3 γm1) + Atg fy/γm0]. 10 marks
The plan of a ground floor column in a building is shown in the figure. It is desired to reduce the longitudinal bar diameter from 30 mm to 20 mm above the second floor level. Design and detail a suitable lap splice. Assume M25 grade concrete and Fe 500 grade steel. 10 marks
हिंदी में प्रश्न पढ़ें
लिंक ABCD का मुक्त पिंड आरेख बनाइए और चित्र में दर्शाए गए समन्वयोजन के A, B, C और D पर लगने वाले सभी प्रतिक्रिया बलों को निर्धारित कीजिए। (सभी विमाएँ mm में हैं) 10 अंक
2L लम्बाई की एक क्षैतिज प्रास धरन का मुक्त सिरा, लम्बाई L और क्षेत्रफल 'A' की ऊर्ध्वाधर तान छड़ जो आरम्भ में तनाव रहित है, से जुड़ा है। यदि प्रास धरन का जड़त्व आघूर्ण I है, तो तान छड़ द्वारा वहन किए जाने वाले भार का निर्धारण कीजिए जब प्रास की आंतरिक अर्ध लम्बाई पर 'w' प्रति एकक लम्बाई का एक एकसमान वितरित भार रखा गया है। तान छड़ और प्रास धरन के लिए प्रत्यास्थता गुणांक E है। 10 अंक
बिन्दु 'C' और 'D' पर अधिकतम बंकन आघूर्ण की गणना कीजिए यदि एक दूसरे से 1·52 m की समान दूरी पर स्थित 160 kN के पाँच भार घन को दाएँ से बाएँ की ओर पार करते हैं। 10 अंक
Fe 410 ग्रेड के एक लोह-कोण परिच्छेद ISA 65 × 65 × 6 से बना ट्रस का एक तान अवयव 8 mm की संगम पट्टिका से वेल्डित है। अवयव की पूर्ण सामर्थ्य के बराबर के भार को प्रेषित करने के लिए वेल्ड की अभिकल्पना कीजिए। कार्यशाला वेल्डिंग मान लीजिए। वेल्ड आमाप 4 mm और f_y = 250 MPa लीजिए। ISA 65 × 65 × 6 के गुणधर्म हैं: A = 744 mm², Cz = 18·1 mm, γm0 = 1·1, γm1 = 1·25. Tdb = [Avg fy/(√3 γm0) + 0·9 Atn fu/γm1] या Tdb = [0·9Avn fu/(√3 γm1) + Atg fy/γm0]. 10 अंक
एक भवन में एक भूतल स्तंभ का अनुविभेद चित्र में दर्शाया गया है। अनुद्देश्य छड़ों के व्यास को, दूसरी मंजिल से ऊपर, 30 mm से घटाकर 20 mm किया जाना वांछित है। एक उपयुक्त चढ़ाव जोड़ पट्टी का अभिकल्पन कीजिए और विवरण दीजिए। M25 ग्रेड कंक्रीट और Fe 500 ग्रेड इस्पात मान लीजिए। 10 अंक
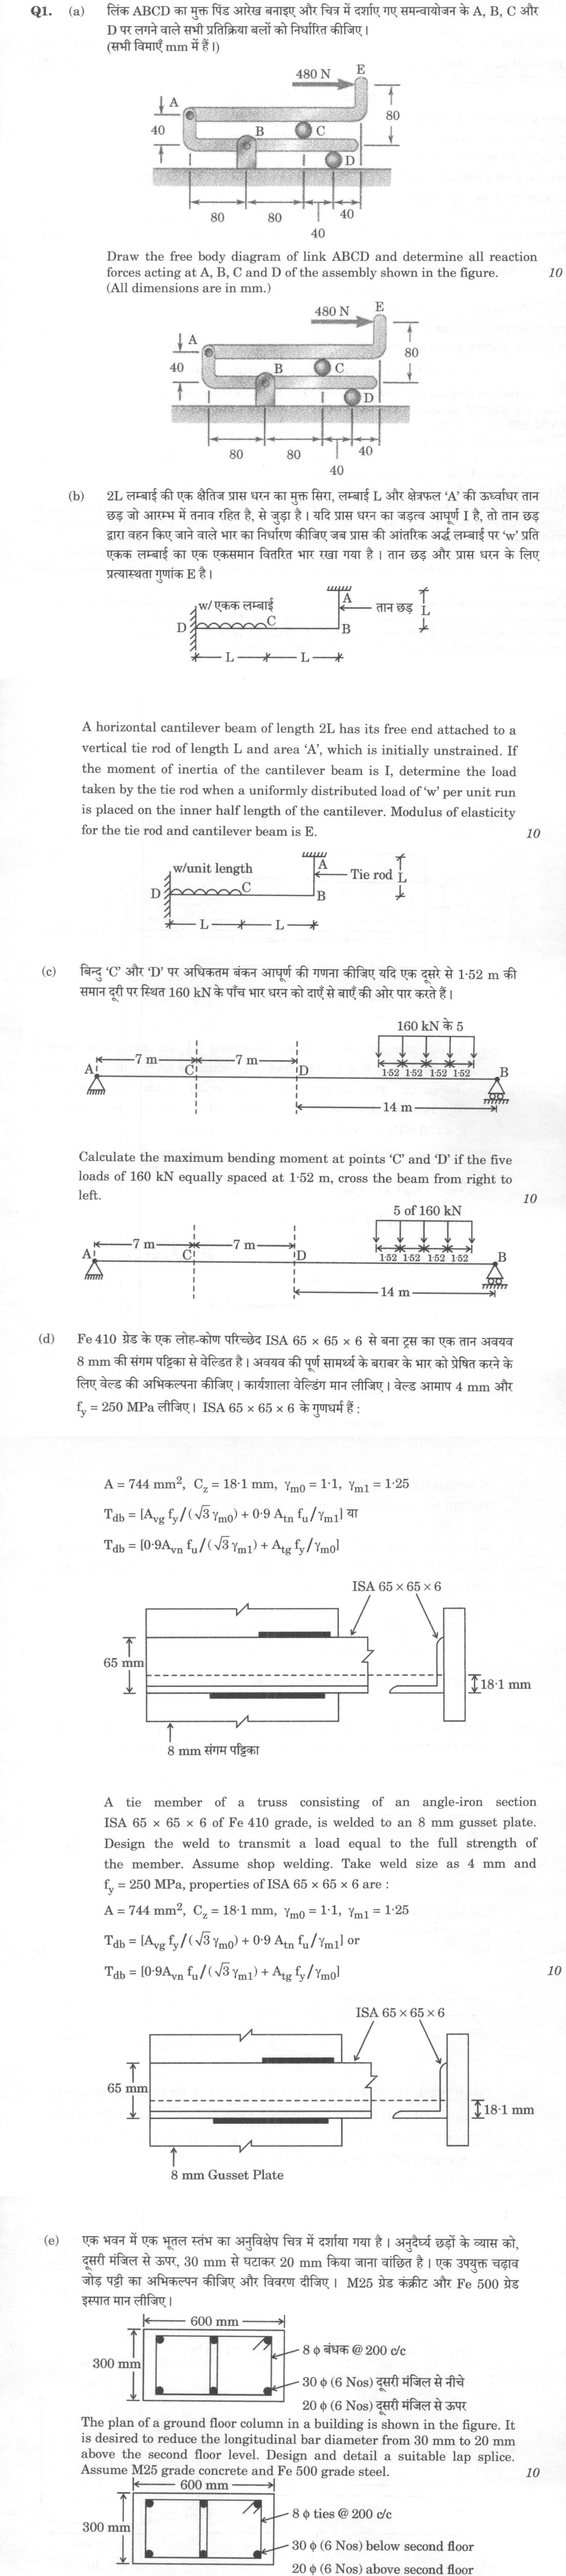
The figure this question refers to, in words
The question paper is a scan and the diagram did not survive as text. This is the figure as read from the original page — every component, value and label — so the question can be worked from the text below.
(a) A mechanical assembly consisting of a bent link ABCD and a support structure. The link is a rigid body with a horizontal top segment and a vertical right segment. Point A is a pin support located at the left end of the horizontal segment. Point B is a pin support located on the underside of the horizontal segment, 80 mm to the right of A. Point C is a roller support located on the underside of the horizontal segment, 80 mm to the right of B. Point D is a roller support located on the underside of the horizontal segment, 40 mm to the right of C. The vertical segment of the link extends upwards from the right end of the horizontal segment. A horizontal force of 480 N acts to the right at point E, which is at the top of the vertical segment. The vertical distance from the horizontal segment to point E is 80 mm. The vertical distance from the horizontal segment to the level of supports B, C, and D is 40 mm. The supports B, C, and D rest on a fixed horizontal ground surface.
(b) A horizontal cantilever beam is fixed at its left end, labeled D. The total length of the beam is 2L, divided into two segments of length L each. The right end of the beam is labeled B. A vertical tie rod of length L is attached to the free end B of the beam and extends upward to a fixed support at point A. A uniformly distributed load labeled 'w/unit length' is applied over the left half of the beam, from the fixed support D to the midpoint C. The distance from D to C is L, and from C to B is L.
(c) A simply supported beam with a total span of 28 m. The left support is a pin support at point A, and the right support is a roller support at point B. Point C is located 7 m from support A. Point D is located 14 m from support A (mid-span). A moving train of five point loads, each of magnitude 160 kN, is shown on the right side of the beam. The loads are equally spaced at 1.52 m intervals. The diagram shows the loads positioned such that the rightmost load is near support B.
(d) A structural detail showing a connection between an angle-iron section and a gusset plate. The angle section is labeled 'ISA 65 x 65 x 6'. It is depicted in two views: a side elevation and a cross-section. The side view shows the angle attached to a vertical plate labeled '8 mm Gussset Plate' (or '8 mm संगम पट्टिका' in Hindi). The angle has a leg length of 65 mm. The cross-section view shows the angle profile attached to the plate. A dimension line indicates the distance from the back of the angle to the centroid is 18.1 mm. The connection is made via welds, shown as thick black lines along the edges of the angle legs where they meet the gusset plate.
(e) A rectangular column cross-section with dimensions 600 mm width by 300 mm depth. The section is divided into two halves by a central vertical line. There are 8 ties (stirrups) spaced at 200 mm center-to-center. The longitudinal reinforcement consists of 6 bars of 30 mm diameter located below the second floor level and 6 bars of 20 mm diameter located above the second floor level. The bars are positioned at the corners and mid-points of the sides.
What "Solve" is asking you to do
Choose the method, then carry it through to a final answer. Identifying what kind of problem this is and why that method applies is the first thing marked; a correct figure arrived at invisibly earns almost nothing.
Structure that answers it
Given data and what is required → method chosen, with the reason it applies → set-up (equation, circuit, free body, trial balance) → working, step by step → answer with units and any condition of validity
Where marks are lost
Doing the middle steps mentally and writing only the result. In mathematics papers, a further loss comes from giving a decimal where the exact value in surds or fractions was wanted, or from skipping the justification a part explicitly asks for.
How this answer will be evaluated
Approach
(a) calculate: given > formula > substitution > result with units > interpretation | (b) calculate: given > formula > substitution > result with units > interpretation | (c) calculate: given > formula > substitution > result with units > interpretation | (d) calculate: given > formula > substitution > result with units > interpretation | (e) calculate: given > formula > substitution > result with units > interpretation Full marks: All parts solved with correct method, units, and checks.
Key points expected
- Free body diagram of link ABCD
- Equilibrium equations (ΣFx, ΣFy, ΣM)
- Reaction components at A, B, C, D
- Correct units (N or kN)
- Compatibility equation (deflection)
- Force method or superposition
- Expression for rod load in terms of w, L, A, I, E
- Correct units
Evaluation rubric
Each sub-part is marked on its own, against the marks and word limit printed on the paper.
- (a) Free body diagram and reaction forces at A, B, C, D. 10 marks
calculate— given → formula → substitution → result with units → interpretation
Must cover
- Free body diagram of link ABCD
- Equilibrium equations (ΣFx, ΣFy, ΣM)
- Reaction components at A, B, C, D
- Correct units (N or kN)
Loses marks
- Missing FBD
- Incorrect sign convention
Earns more
- Clear labeling of dimensions
- Step-by-step moment calculation
Extra mark
- Verification of equilibrium
- (b) Load taken by the tie rod. 10 marks
calculate— given → formula → substitution → result with units → interpretation
Must cover
- Compatibility equation (deflection)
- Force method or superposition
- Expression for rod load in terms of w, L, A, I, E
- Correct units
Loses marks
- Ignoring compatibility
- Incorrect deflection formula
Earns more
- Clear FBD of beam and rod
- Deflection formulas stated
Extra mark
- Numerical check if data given
- (c) Maximum bending moment at C and D. 10 marks
calculate— given → formula → substitution → result with units → interpretation
Must cover
- Influence line diagrams for C and D
- Placement of 5 loads for max BM
- Calculation of BM at C and D
- Correct units (kN-m)
Loses marks
- Incorrect load placement
- Missing ILD
Earns more
- ILD sketch
- Step-by-step summation
Extra mark
- Comparison of max BM values
- (d) Weld design for full member strength. 10 marks
calculate— given → formula → substitution → result with units → interpretation
Must cover
- Member strength calculation (Tdb)
- Weld strength formula (shop welding)
- Weld length calculation
- Correct units (mm, N, MPa)
Loses marks
- Ignoring γm factors
- Incorrect weld strength formula
Earns more
- Use of given properties (A, Cz, γm0, γm1)
- Clear weld layout sketch
Extra mark
- Check for weld size limits
- (e) Lap splice design for column bars. 10 marks
calculate— given → formula → substitution → result with units → interpretation
Must cover
- Lap length calculation (M25, Fe500)
- Splice arrangement (staggered)
- Detailing sketch
- Correct units (mm)
Loses marks
- Ignoring concrete grade
- Incorrect lap length formula
Earns more
- Reference to IS 456 clause
- Clear splice detail
Extra mark
- Check for bar congestion
Model answer coming soon
Every evaluation on this site is marked against a verified model answer. This question's answer is still being written; evaluation opens the moment it lands.
More from Civil Engineering 2025 Paper I
- Q1 (a) Draw the free body diagram of link ABCD and determine all reaction forces acting at A…
- Q2 (a) A T-section beam is constructed by gluing two pieces of wood together as shown in the…
- Q3 (a) Analyse the continuous beam shown in the figure by slope-deflection method. Draw the…
- Q4 (a) Analyse the frame shown in the figure by the moment distribution method. Draw the Ben…