Paper I — Q6
(a) A submarine can be assumed to have cylindrical shape with rounded nose. Assuming its length to be 55 m and diameter 6·0 m…
A submarine can be assumed to have cylindrical shape with rounded nose. Assuming its length to be 55 m and diameter 6·0 m, determine the total power required to overcome boundary friction if it propels at the velocity of 8·0 m/s in sea water at 20°C. Take mass density of sea water at 20°C as 1030 kg/m³ and kinematic viscosity of sea water at 20°C as 1 × 10⁻⁶ m²/s. 15 marks
For the beam shown in the figure below Compute the support reactions.
Write the shear force (V) and bending moment (M) value(s) at salient points as indicated in the table.
| x | A | B | C | D | E | F |
|---|---|---|---|---|---|---|
| V | ||||||
| M |
Draw the shear force diagram (SFD) indicating the nature of graph.
Draw the bending moment diagram (BMD) indicating the nature of graph.
Sign conventions for SFD and BMD are as follows:
+V
+M
25 kN/m
50 kN
40 kN
A
B
•C
•D
•E •F
300 kN-m
0.5 m
1 m
2 m
1.5 m
0.5 m 0.5 m 25 marks
Size of a rectangular simply supported beam is restricted to 300 mm × 500 mm (overall). The effective span of the beam is 5 m. The beam is subjected to an imposed load of 64 kN/m. Design the beam using M 20 grade of concrete and Fe 415 grade of steel. Take effective cover as 40 mm and width of supporting wall as 250 mm. The stress in the reinforcement can be derived from the stress-strain curve given below. Use limit state method of design.
Eₛ = 200000 N/mm² 20 marks
हिंदी में प्रश्न पढ़ें
एक पनडुब्बी को गोलाकार मुख के साथ बेलनाकार आकृति का माना जा सकता है । इसकी लंबाई 55 m और व्यास 6·0 m मानते हुए सीमांत घर्षण को पार करने के लिए आवश्यक संपूर्ण शक्ति का निर्धारण कीजिए, यदि यह 20°C के समुद्री जल में 8·0 m/s के वेग पर नोदन करता है । 20°C पर समुद्री जल का द्रव्यमान घनत्व 1030 kg/m³ और 20°C पर समुद्री जल की शुड्रगतिक श्यानता 1 × 10⁻⁶ m²/s लीजिए । (15 अंक)
नीचे चित्र में दर्शाई गई धरन के लिए आलम्ब प्रतिक्रियाओं की गणना कीजिए।
सारणी में निर्दिष्ट प्रमुख बिन्दुओं पर अपरूपण बल (V) और बंकन आघूर्ण (M) के मानों को लिखिए।
| x | A | B | C | D | E | F |
|---|---|---|---|---|---|---|
| V | ||||||
| M |
ग्राफ की प्रवृति इंगित करते हुए अपरूपण बल आरेख (एस.एफ.डी.) बनाइए।
ग्राफ की प्रवृति इंगित करते हुए बंकन आघूर्ण आरेख (बी.एम.डी.) बनाइए।
एस.एफ.डी. और बी.एम.डी. के लिए चिह्न रूढ़ियाँ निम्न प्रकार हैं :
25 kN/m
50 kN
40 kN
A
B
•C
•D
•E •F
300 kN-m
0.5 m
1 m
2 m
1.5 m
0.5 m 0.5 m (25 अंक)
एक आयताकार शुद्धलम्बित धरन का आमाप 300 mm × 500 mm (समग्र) तक सीमित है । धरन की प्रभावी विस्तृति 5 m है । धरन पर 64 kN/m का एक रैखित भार लगा है । M 20 ग्रेड कंक्रीट और Fe 415 ग्रेड इस्पात का उपयोग करते हुए धरन का अभिकल्पन कीजिए । प्रभावी आवरण 40 mm और आलम्ब प्रदान करने वाली भित्ति की चौड़ाई 250 mm लीजिए । प्रबलन में प्रतिबल को नीचे दिए गए प्रतिबल-विकृति वक्र से व्युत्पन्न किया जा सकता है । अभिकल्पन की सीमांत अवस्था विधि का उपयोग कीजिए ।
Eₛ = 200000 N/mm² (20 अंक)
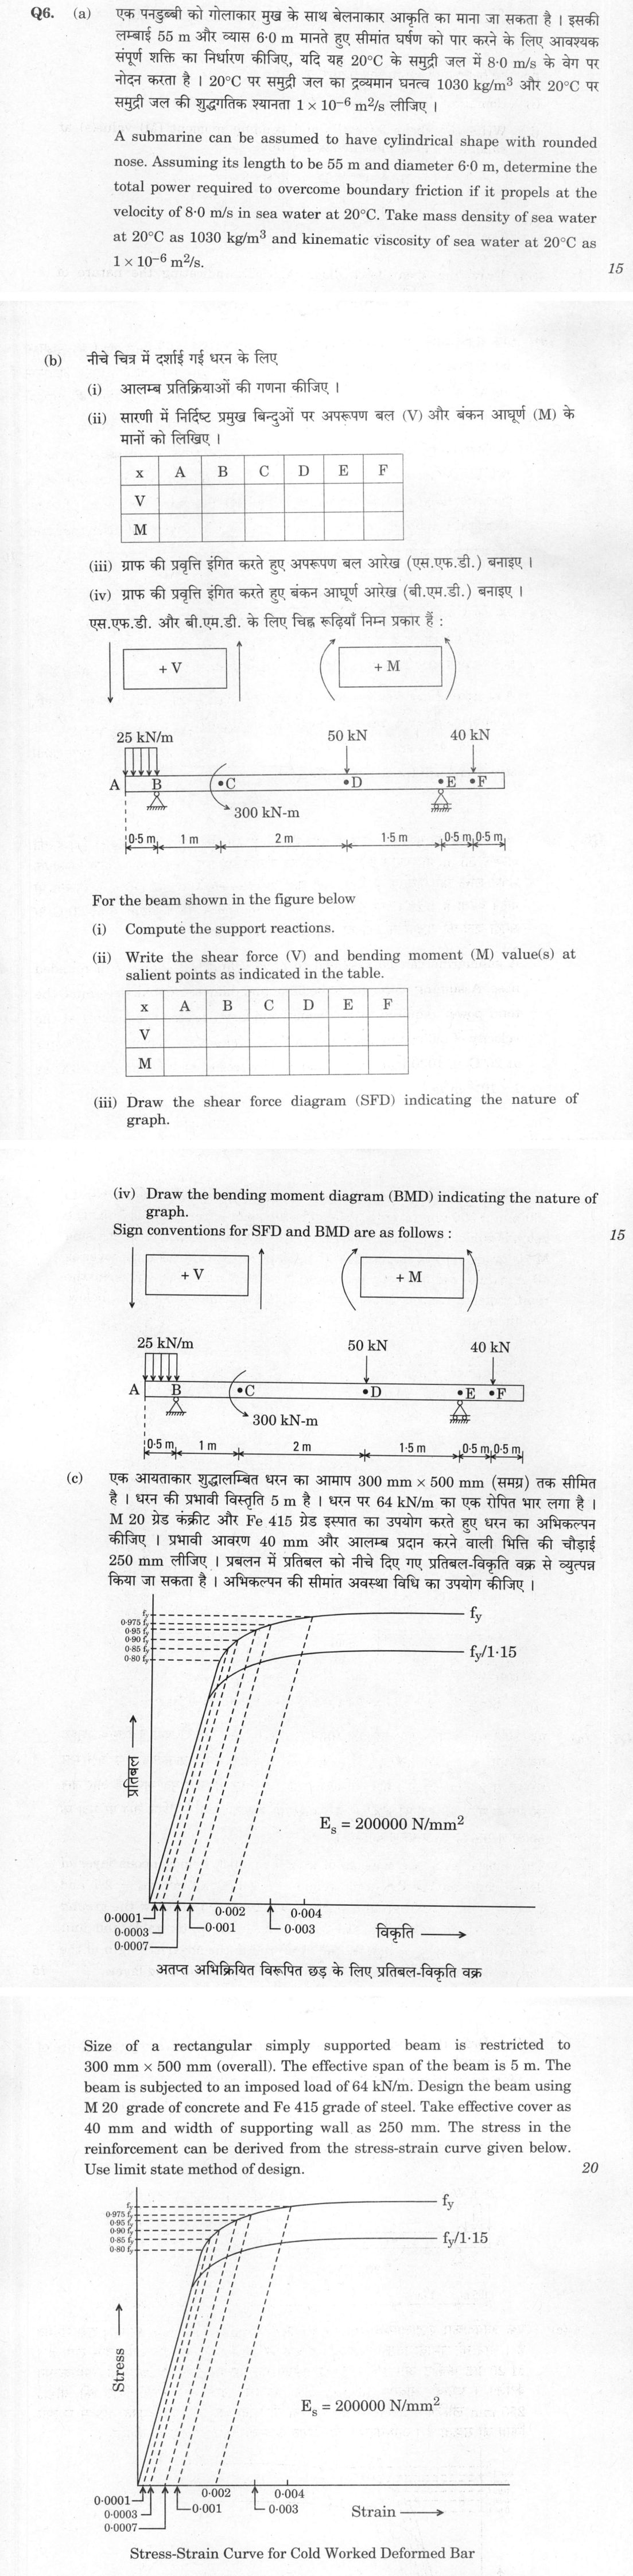
The figure this question refers to, in words
The question paper is a scan and the diagram did not survive as text. This is the figure as read from the original page — every component, value and label — so the question can be worked from the text below.
(b) A horizontal beam with supports at points A and B. Point A is a pin support located at the left end. Point B is a roller support located 1.5 m to the right of A. The beam extends to the right from B to point F. The total length of the beam is 5.5 m. The beam is divided into segments by points C, D, E, and F. The distance from B to C is 1 m. The distance from C to D is 2 m. The distance from D to E is 0.5 m. The distance from E to F is 0.5 m. A uniformly distributed load of 25 kN/m acts downwards over the entire length of the beam from A to F. A concentrated point load of 50 kN acts downwards at point C. A concentrated point load of 40 kN acts downwards at point E. A clockwise concentrated moment of 300 kN-m is applied at point D. The points A, B, C, D, E, and F are marked along the beam.
(c) A stress-strain curve graph for Cold Worked Deformed Bar. The vertical axis is labeled 'Stress' and the horizontal axis is labeled 'Strain'. The curve starts at the origin, rises linearly, then curves to a plateau. The linear portion is labeled with a slope of Es = 200000 N/mm². The horizontal axis has tick marks at 0.0001, 0.0003, 0.0007, 0.002, 0.004. The vertical axis has dashed lines indicating stress levels: 0.80 fy, 0.85 fy, 0.90 fy, 0.95 fy, 0.975 fy, and fy. A secondary curve is shown below the main one, labeled fy/1.15.
What "Solve" is asking you to do
Choose the method, then carry it through to a final answer. Identifying what kind of problem this is and why that method applies is the first thing marked; a correct figure arrived at invisibly earns almost nothing.
Structure that answers it
Given data and what is required → method chosen, with the reason it applies → set-up (equation, circuit, free body, trial balance) → working, step by step → answer with units and any condition of validity
Where marks are lost
Doing the middle steps mentally and writing only the result. In mathematics papers, a further loss comes from giving a decimal where the exact value in surds or fractions was wanted, or from skipping the justification a part explicitly asks for.
How this answer will be evaluated
Approach
(a) calculate: given > formula > substitution > result with units > interpretation | (b(i)) calculate: given > formula > substitution > result with units > interpretation | (b(ii)) calculate: given > formula > substitution > result with units > interpretation | (b(iii)) describe: define > structure or process in order > labelled diagram > significance | (b(iv)) describe: define > structure or process in order > labelled diagram > significance | (c) calculate: given > formula > substitution > result with units > interpretation Full marks: Complete method with all checks, neat diagrams, and code references
Key points expected
- Calculate Reynolds number using given dimensions and velocity
- Determine friction coefficient from Reynolds number
- Compute total wetted surface area of cylinder
- Calculate power as drag force times velocity
- Apply equilibrium equations for vertical forces
- Apply moment equilibrium about one support
- Show all load positions and magnitudes clearly
- State reaction values with correct units
Evaluation rubric
Each sub-part is marked on its own, against the marks and word limit printed on the paper.
- (a) Total power required to overcome boundary friction for the submarine. 15 marks
calculate— given → formula → substitution → result with units → interpretation
Must cover
- Calculate Reynolds number using given dimensions and velocity
- Determine friction coefficient from Reynolds number
- Compute total wetted surface area of cylinder
- Calculate power as drag force times velocity
Loses marks
- Missing Reynolds number calculation
- Incorrect wetted area calculation
- No unit consistency in final power value
Earns more
- State assumption of cylindrical shape with rounded nose
- Show unit conversions clearly
- Reference standard friction coefficient chart or formula
- Check result against typical submarine power requirements
Extra mark
- Mention specific IS code or standard for friction calculations
- Provide neat sketch of submarine with dimensions labelled
- (b(i)) Support reactions at B and E for the given beam.
calculate— given → formula → substitution → result with units → interpretation
Must cover
- Apply equilibrium equations for vertical forces
- Apply moment equilibrium about one support
- Show all load positions and magnitudes clearly
- State reaction values with correct units
Loses marks
- Missing moment equilibrium calculation
- Incorrect load position identification
- No verification of reaction values
Earns more
- Draw free body diagram with all loads and reactions
- Show step-by-step moment calculations
- Verify reactions using second equilibrium equation
- Label all distances from supports clearly
Extra mark
- Mention specific IS code for beam analysis
- Provide neat labelled free body diagram
- (b(ii)) Shear force and bending moment values at points A, B, C, D, E, F.
calculate— given → formula → substitution → result with units → interpretation
Must cover
- Calculate V and M at each specified point
- Apply correct sign conventions for V and M
- Show calculation steps for each point
- Present values in the provided table format
Loses marks
- Incorrect sign convention application
- Missing calculation steps for any point
- Values not presented in table format
Earns more
- Show section cuts for each point calculation
- Verify values using equilibrium conditions
- Indicate nature of shear and moment at each point
- Use consistent units throughout calculations
Extra mark
- Mention specific IS code for sign conventions
- Provide neat section cut diagrams for each point
- (b(iii)) Shear force diagram showing nature of graph.
describe— define → structure or process in order → labelled diagram → significance
Must cover
- Plot V values against beam length
- Indicate linear or constant segments correctly
- Show zero shear points clearly
- Label all significant values on diagram
Loses marks
- Incorrect segment nature (linear vs constant)
- Missing zero shear point indication
- No scale or units on diagram
Earns more
- Show area under SFD equals moment change
- Indicate slope changes at load points
- Use proper scale and units on axes
- Mark maximum and minimum shear values
Extra mark
- Mention specific IS code for SFD conventions
- Provide neat labelled SFD with all values
- (b(iv)) Bending moment diagram showing nature of graph.
describe— define → structure or process in order → labelled diagram → significance
Must cover
- Plot M values against beam length
- Indicate parabolic or linear segments correctly
- Show maximum and minimum moment points
- Label all significant values on diagram
Loses marks
- Incorrect segment nature (parabolic vs linear)
- Missing maximum/minimum moment indication
- No scale or units on diagram
Earns more
- Show slope of BMD equals shear force
- Indicate inflection points if present
- Use proper scale and units on axes
- Mark points of zero moment clearly
Extra mark
- Mention specific IS code for BMD conventions
- Provide neat labelled BMD with all values
- (c) Design of rectangular beam using limit state method. 20 marks
calculate— given → formula → substitution → result with units → interpretation
Must cover
- Calculate factored load using IS 456 load factors
- Determine design moment from span and loading
- Calculate required steel area using limit state equations
- Check minimum and maximum steel percentages
Loses marks
- Missing load factor application
- No steel percentage checks
- Incorrect design moment calculation
Earns more
- Show stress-strain curve application for steel
- Verify deflection limits per IS 456
- Check shear capacity and provide stirrups if needed
- State all assumptions clearly
Extra mark
- Mention specific IS 456 clauses used
- Provide neat section drawing with reinforcement details
Model answer coming soon
Every evaluation on this site is marked against a verified model answer. This question's answer is still being written; evaluation opens the moment it lands.
More from Civil Engineering 2021 Paper I
- Q3 (a) The figure below represents time and consolidation relationship for a clay sample 30…
- Q4 (a) Determine the maximum tensile force in member DI of the truss shown below due to the…
- Q5 (a) A circular log of weight 1000 N and radius 18 cm is supported by a pair of brackets,…
- Q6 (a) A submarine can be assumed to have cylindrical shape with rounded nose. Assuming its…
- Q7 (a) The subsoil at a site consists of a 12·0 m thick homogeneous layer of dense sand havi…
- Q8 (a) A 300 mm diameter concrete pile is to be driven into a medium dense to dense sand wit…